Showing posts with label Wedding. Show all posts

Friday, June 29, 2012

Special request Wedding card

A special request for a heart shaped - braided satin ribbon - easel wedding card with a pocket for an enclosed monetary gift. Wow that's a mouth full.  My friend saw the easel card I posted in May [here] and asked to have one made for a wedding in July. 


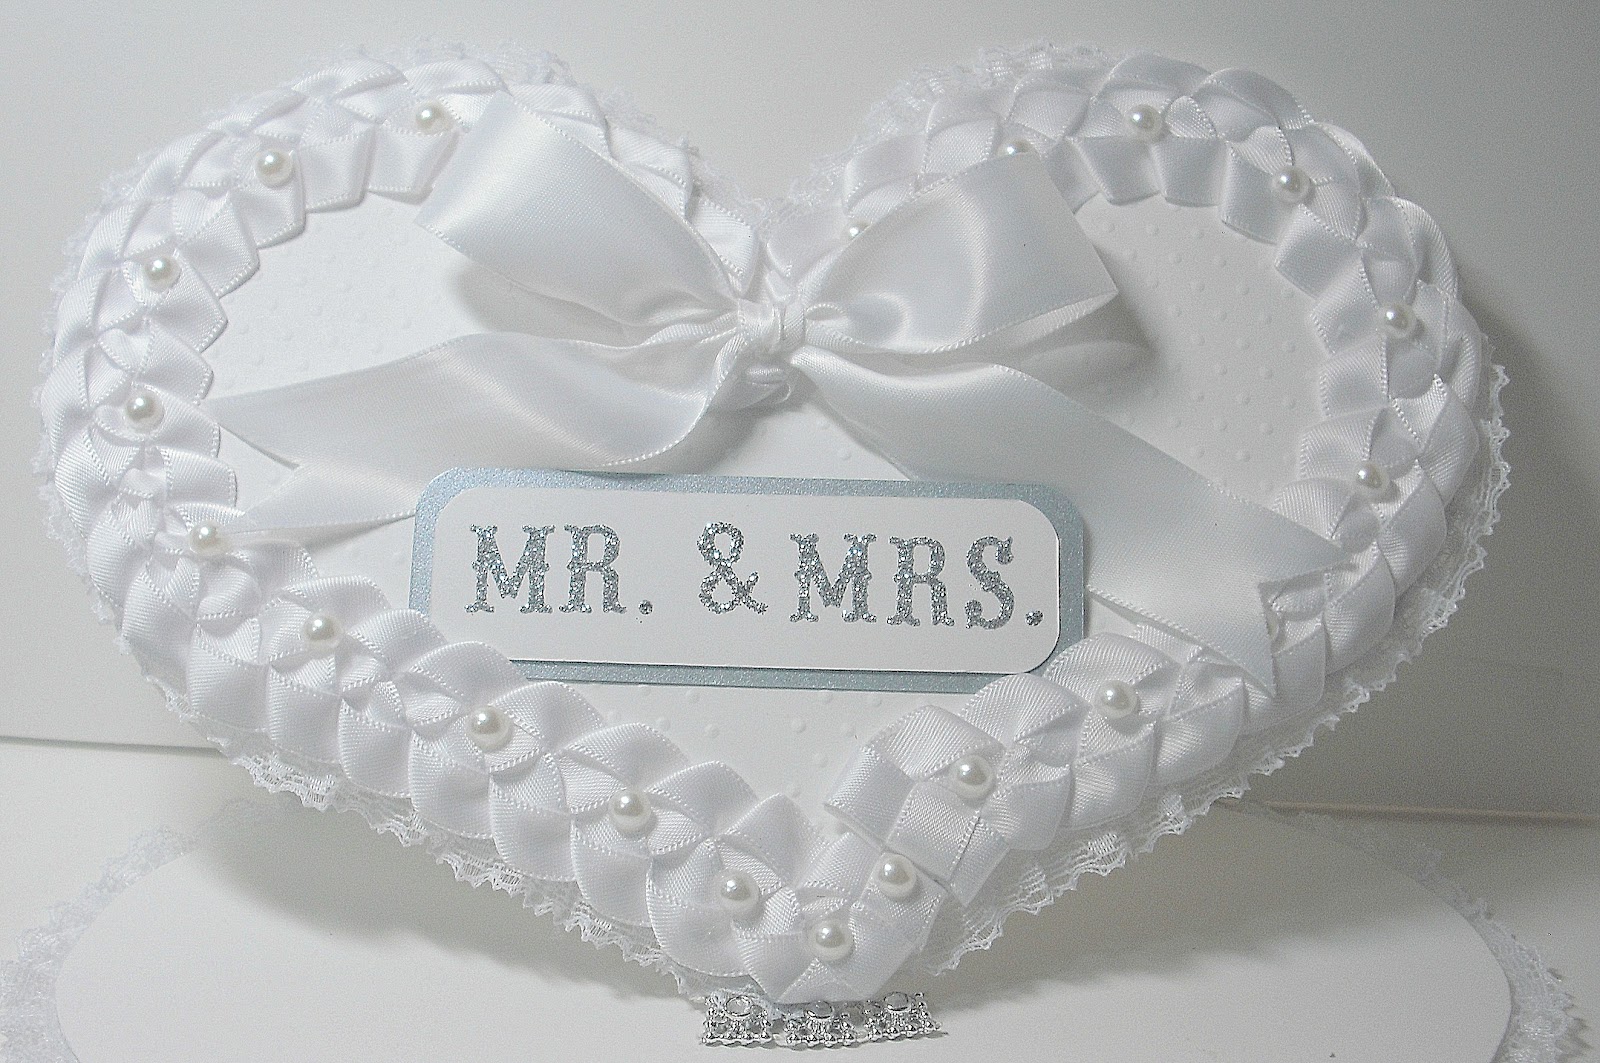
I don't know about you, but I have a hard time doing the same card twice. I always want to improve it or add a new twist, and so I have. I spray glued 2 sheets of card stock together to create a very sturdy card, able to support the full heart on the easel fold. I replaced the "Congratulations" silver sticker for "Mr.&Mrs." glitter letters on white backed with silver. I added the tiny lace with fabric glue for the twist.

This second picture shows the back of the card - outlined with lace and a border punched pocket - shaped like the bottom of the heart. I puzzled over this for quite a while. No place to place a pocket inside. I thought about a hidden pocket...my grand kids love those...but this is serious. So it's on the back.

The picture on the left shows the card standing, and the right shows the inside. A personal message can be added to the top inside, or included in the back pocket.

Now for the envelope. The card measures 
7" X 9" and with the braided ribbon and pearls it's about 3/4" thick. I decided to make a box with an acetate lid. I was surprised how easy that was. Definitely easier than an envelope. I covered a piece of cardboard [from a stack of 12 X12 papers] cut to 8.5" X 10.5" allowing for a 3/4" depth, with silver card stock for the inside of the box. I scored and folded the bottom using glue dots to attach the side cuts. Love those glue dots...no mess...no drying time. The acetate lid was cut, scored and folded and glued the same way.

I'm tempted to embellish the lid .... a flourish made with silver stickles or liquid pearls....maybe two doves punched from glitter paper....oh flowers would be cool....but maybe just a bow. What do you think?

A gift card, hopefully kept to remember the giver and the gift.

"The older I get, the less time I want to spend with the part of the human race that didn't marry me."  ~Robert Brault

Thanks for looking...if you like it let me know. Be well ~ Carole

Thursday, June 21, 2012

The Shabby Tea Room Challenge


The Shabby Tea Room  Week #119 "Diamonds are a girls best friend"  Create a card or project inspired by the colors in the photo and include pearls and or crystals. How fun is that? This is the first time I'm entering this challenge, and the way I understand it is: the the winners get to be a guest designer. That would be an honor and a privilege. 
The Shabby Girls are pleased to welcome two sponsors: Meljen's Designs  offers cute and  whimsical digital stamps featuring mice, teddy bears, sweet children and more. The second sponsor is: Digital Paper by Janer Etsy .  Janet has so many beautiful digital papers with both vintage and whimsical designs. You are sure to find just the right image and paper when visiting these sponsors. 
I started the top layer for this card by stamping a flourish in two different directions with Versa Mark. I added clear embossing powder and heat set. Following the design self-adhesive pearls, rhinestones, floral ribbon and liquid pearls were added. The design has the two doves (punched from white glitter paper) meeting at the joining. So romantic! The top layer is then attached to a white glitter paper. The silver sentiment sticker completes the card. 
The second card is on acetate. I stamped another flourish on card stock then place it in the card so that I could follow the design using liquid pearls. When that was dried I attached a 3'X4" metallic mother of pearl card stock rectangle. The rectangle has dry embossed outlines, embellished with a silver sticker sentiment, attached to the inside front of the card with glue dots. I used glue dots to attach the floral ribbon - embellished with rhinestones to the outside front of the card to cover the inside glue dots.  
A second rectangle is placed inside directly behind the front panel for the message. The satin ribbon and bow completes this card. 
I enjoyed playing with the liquid pearls and I'm getting better at controlling the size of the dots. I found I couldn't create a smooth even line so dots it is. I played with puffy fabric paint too as well as stickles. Stop back again and you'll see what I do with them.  Be well. Carole     
 The bonds of matrimony are like any other bonds - they mature slowly.  ~Peter De Vries   


Wednesday, June 20, 2012

CAS-UAL FRIDAYS CFC57


cfc57Create a clean and simple card using acetate or velum.

This weeks sponsor is Girl Friday Karolyn Loncon designer of  6 stamp sets for Paper Smooches and this week's winner will receive her entire collection. It sure would be fun to win that!  
 Here is the card I created: a 5" square acetate card. I started by stamping the swirl image on white paper then placed the stamped image behind the acetate and followed the swirls with silver self-adhesive pearls. 

The issue with using acetate is that you can see the adhesive that is used. So keeping that in mind I made the 2.5" square to be place in the center and placed silver beads on the corners where the glue dots would be and created the swirls to cover the other 2 corners .    

I cut another 2.5" square for the inside, lined up behind the front square-I put the glue dots on the back corners and closed the card insuring that it would match perfectly. I placed a third square on the back so that I could stamp "made just for you" by Carole.

I try to use the products that I have so that's what inspired the silver. Wouldn't this look great using tiny little pearls along with the bigger ones? I also tried using liquid pearls on the acetate. I will post those pictures later for a different challenge.


 "Like good wine, marriage gets better with age - 
once you learn to keep a cork in it."   ~Gene Perret     

 Be well. Carole


Thursday, May 24, 2012

Special Requests


Isn't this the most adorable vintage picture? Perfect for the parents of a new baby boy. Born on Mother's Day. When my sister saw the baby card I posted yesterday  (pictured on the right) she requested one for a boy. It's so much easier to recreate a card then to design a new one.

Baby love is on ivory card stock with tiny blushed pink pearls. Baby Nolan is on white card stock with smoky blue pearls. It's really fun when creating a personalized card. I printed his birth date and his parents name on velum with blue ink and a welcome to the world message. I think the blue satin bow is a nice pop of color. I'll bet it goes in a scrapbook.

I've had several more requests for wedding cards and white on white is the theme. Here I used my new SB dies to do a reverse embossing. I placed the dies cut side down on the card stock layered with the rubber mat and B plate top and bottom. Wow it really does a deeply etched embossing. I cut the same corner pieces to embellish the oval frame, then rounded the corners for the finishing touch. Simple and elegant.

Next up is a one layer card with 5 little pendant cuts  from the Fleur De Lis shapeabilities collection. Satin and pearls inspired by a splitcoast stamper.
Simplicity at it's finest.


The cancer awareness card I posted yesterday is now complete. My sister approved of the sentiment "Embrace Life" to appear on the front and a personal message printed on velum for the inside. I used glossy accents on the framed sentiment for some depth and shine. This card was inspired by another splitcoast stamper. Check it out she made it in 2009. Her card has sewn stitches and a stamped image. I don't have very many stamps so I used die cuts and punches. That's all for today.

I continue to be inspired by all I see out here in blog land and on Pinterest. Be well and I'd love to hear some feed back, so leave a comment and I'll return to visit you.

Carole

Friday, May 11, 2012

Heart Easel Card

I'm back with a second posting for today. I'm happy to say after viewing a tutorial on a butterfly easel card I figured out how to do a heart easel. I kept this pretty simple because the weaved ribbon is so elegant. White satin with pearls on a dotted Swiss embossed background... simply divine. I used silver stickers for the inside and 3 pieces of a silver embellishment I found in the ribbon department of our local craft store.


The next photo shows the card closed and the third photo gives you a glimpse inside.


The "Congratulations" sticker looks crocked in the photo but it's just the ribbon needs to be adjusted.


I will be able to recreate this card pretty quickly...that is if I duplicate it with out any change.. There's always room for improvement but I'm delighted with this card. What do you think?


"The creative adult is the child who survived" ~ U. LeGuin

Thanks for stopping by...craft on;)
Carole

Simply Formal

Another card inspired by lime doodle
Simple yet formal. I love it. Bow ties are cool!

I added 1/4" score lines below the tie and used sticker lettering with rhinestones. The first one I made I used white card stock and covered it. Then I tried just using the black card stock and adding photo corners to the inside for the white insert. Quick and easy, gotta love that.

I sold 7 wedding cards at our Woman's Club luncheon and fashion show, and had requests for 3 more. I was delighted when they asked about the price, and no one objected when I boldly said $10.00 each. They most know that the time and detail for an original personalized card with a lined envelope would sell commercially for far more. So I'm happy to create some income to contribute to the expense of my passion for creating cards.
  I've designed so many white on white cards...and I love them.  By adding texture, dimension  and embellishments you add so much interest. But now I had to try something different. I think silver is a nice touch and glitter tape for some bling.  I used a SB oval to cut the window and added the silver backing, then I embossed it and added the birds and the floral sprays.

Black white and silver looks very modern to me. Playing around with the same design but tweaking it so it's unique I cut the oval window and  made it a top fold card. I really do have a hard time creating duplicate cards. I'm not very fond of this card...but it might appeal to someone.


  Crooked Card Creations  posted a beautiful heart shaped easel card that I just loved, using weaved ribbon.  So I learned how to weave ribbon by watching the u tube video link she provided.  It's pretty easy and creates a very elegant result. I plan on creating some cards using this weaved ribbon as so as I come up with a design.

"What we have to learn to do, we learn by doing." ~ Aristotle

Until next time be well. Carole

Sunday, April 29, 2012

More wedding cards

Wow I'm not particularly good at taking a white on white picture, my skills lie elsewhere. Yet I did go back and try again using a blue background. I hope you can see the quality and details of these embossed and dimensional cards. There's ribbon-lace-pearls-petals birds-hearts and rings.

Pictured behind is the hand made envelope, lined with satin type paper with a border punched edge.

I created these detailed wedding cards for friends, keeping in mind one is for a grandson's wedding. How wonderful to receive a very special card created just for your wedding day as a keepsake from your Grandmother maybe to put in a scrapbook for future generations to know something of her love for family.
I'm not sure which card she'll pick - so the printed name label is not permanently attached.


The next photo shows the inside pocket and a velum overlay with a love quote and best wishes printed in grey.

The floral spray is to cover the adhesive used to attach the velum.


Layers of paper, punched and die cut, embossed and embellished. There are several elements that were both time consuming and fun. If I were to sell them for profit they would cost at least $25.00 - what do you think? What's the value of a keepsake?


"Love has nothing to do with what you are expecting to get-
only with what you are expecting to give - which is everything."
Katharine Hepburn.

Thanks for visiting...till next time
Be well
Carole


Saturday, April 21, 2012

More Wedding Cards


Hello My Friend, thanks for stopping by. 
I took a few  samples of wedding cards to our Woman's club luncheon,  as requested by a member who's grandson is getting married next month. 

This card features calla lilies in a frame with a side border of hearts and edges glittered with the wonderful new silver glitter tape. The envelope is lined with a satin looking paper. 

I posted a card very similar to this second one a few weeks ago. Yes this one has the double hearts and the double texture but I added double rings tied together with a bow. It has "Congratulations!" as the sentiment instead of Mr. & Mrs. and a spray of three flowers instead of one.  I don't know about you but I have a hard time making the exact same card,I want to change at least one thing to make it unique. This card is 5"X7"and has a hand made envelope lined with the satin paper.

 
Carolyn said I was making it difficult to choose because she liked them all. She mentioned that she wanted a really special card for her grandson because they were giving the couple $$$. Who wouldn't want that? So I said that I would create a pocket of sorts inside to insert the money in. A real gift card.


This photo shows the inside with the pocket scalloped with a lacy border punch. I used my score board to create a 1/4" fold line down the length and across the bottom. This way it's not attached flat to the card. I printed a personal greeting to her grandson and his bride on velum paper. I placed two doves facing each other to cover the glue dots used to attach the greeting to the base. Then I thought I could have used the same border punch for the top of the greeting to cover the adhesive. Next time.


That's what I love about making a card unique, subtle changes. Take the same theme and switch it around. Like this sample. I used a different embossing folder added the double hearts, then attached the doves with dimensional dots and separated the floral spray. This card is 4.25" X 5.50" Much easier to find A2 envelopes. 


Again the same theme, white on white with embossing, flowers and now a swirl. I think I could do several more variations. I could add some color, maybe chalk pastels or pale ribbons. Ivory or silver embellishments. I'm thinking that I'll scan some lace and print it for the envelope liners. Then maybe I'll heat emboss a flourish on the envelope. 

The ideas just keep coming. Does this inspire you?

 In conclusion 5 other members ordered personal wedding cards with pockets inserts. I'm not surprised. The quality of the paper, the time and detail make these gift cards a unique gift.


"I may not have gone where I intended to go, but I think I have ended up where I intended to be."  ~ Douglas Adams

I hope you've enjoyed my creative offerings, and that I may have inspired you as well!
Be well...craft on
Carole 


Sunday, April 1, 2012

Wedding Cards

Formal Tuxedo Shaped card
I've made a Tuxedo Shaped card before...but not with this detail. I did several cuts to layer this card. First the base card in white card stock, then 2 black cuts split for the front and the back of the card. The front jacket cut opened to reveal another layer-the formal shirt cumber-band buttons and bow tie.

I pinned a card like this on my board "cards I want to recreate" hoping it had a link so I could learn how it was done. But no link...so I had to try and try again until I got a card I'm pleased with. I even made the little roses. Fancy Formal and Fun.

A friend at our local Woman's Club asked if I would create a card for her Grandson's wedding to be held in May. So I'm working on several samples. Up next is a white on white card. Again I pinned a similar card on Pinterest so I looked at that for inspiration.

Double Hearts Wedding Card

If she chooses this sample I will remake one with  all pure luxury card stock. If you noticed the base card is a different shade of white. It's plain card stock...the hearts were cut from scraps of pure luxury card stock by Gina K from Stamp TV. This is a double embossed card with embossed lines to separate the two designs and to place the sentiment.

Have you notice the doily in the background of these photos? I crochet in the evenings while my husband watches TV...he flips channels constantly. So instead of getting annoyed or attached to watching one show, I crochet. It keeps the peace and keeps me involved and productive. I love this pattern I will post a picture another time so you can see the beautiful design. Have you ever done a 4 treble popcorn crochet stitch, or a cluster decrease? I'm still learning new stitches after 30 years of crocheting. 

Lacey Fan-Thinking of you
Up next is yet another Pinterest inspired card. I have a friend whose husband has been very ill for so long it breaks your heart. I just deleted the details...to sad...to much information. Any way this is the card I made thinking of Jackie.

The cards are similar to the inspiration cards but I do add my own flair. If you have an interest in comparing my cards to the inspiration cards just follow me on Pinterest. Then let me know how I did.


"The more you are motivated by love, the more fearless and free you actions will be". 
Katherine Mansfield 

That's all for now. Be well
Carole