Showing posts with label Christmas cards. Show all posts

Thursday, December 15, 2011

Holiday Preparations

I haven't posted for over a week because I was working on so many different projects. Some I can't post yet...


I've finished making and posting my Christmas cards!!! This year I even made lined envelopes using kraft paper and sheet music. Then I stamped all the envelopes with a green pine branch on the front and Merry Christmas on the back. They look so nice that I hand printed our return address on all of them. No printed labels on my envelopes. 


 I knew that most of the cards would require extra postage - but that insures that they will not be machine processed. Less damage hopefully. The line of people kept growing while my cards were weighed and stamped. It's that time of year that we need to practice extra patience people.  It's a nice opportunity to have a conversation, share a smile or tell a story. The time will pass quickly.


Most of the cards I mailed were like the door cards I posted last week, with subtle variations. The lamp post cards are toppers from Flower Soft. I applied the glue and flower soft to the lampposts and let it dry. Then attached them to cooper or gold glimmer paper, followed by outline stickers in gold. I added a bow and a sentiment before completing the inside message. These cards measure 4 1/4" X 8" so I had to make the envelopes. I used a recycled ivory paper then stamped the pine branch and sentiment. I made these cards to hand to my friends at  the "Woman's Club of Royersford" meeting today. 


I purchased several of these nostalgic images from Printable Heaven. I used them as toppers but wanted to add more interest by adding the bough and ribbon as well as the outline stickers and sentiment stickers. Oh so quick and easy, but still home made...right?


Finally I made 3D letters to decorate at my sister-in-laws 
60th birthday dinner celebration. She doesn't follow my blog so no worries that she'll see it before the party. Her name is obviously Rose. "S and O" are THE hardest 3d letters to assemble. The lamp post is backed with black core board for dimension and to create the stand. This project took a whole lot of time, but it was a lot of fun to decorate.


So that's what has kept me to busy to post for over a week. Was I missed???  Does anybody read this???  It doesn't matter...I'll keep on doing it for my own satisfaction.


" A ship in harbour is safe, but that is not what ships are built for." William Shedd


Be well and craft on!
Carole

Tuesday, December 6, 2011

More Door Cards

 No time for challenges, I must get busy on my Christmas cards. I'm back with more door cards. I had so much fun making these cards I'm sure I could come up with several more . It makes me want to play 
"Can you spot the differences" with my 5 & 6 year old grandchildren.
This red door is obviously larger with 6 raised panels with all the edges inked in black. The wreath hung from a star has 2 little jingle bells, a gold ribbon and the sentiment "Peace".  The card is 9" X 4 1/4" so I had to make an envelope. 


One night when I awoke at 4 am and knew I wouldn't get back to sleep, I went on Pinterest to amuse myself. I saw an envelope made with kraft paper and lined with sheet music. I love it, and I just happened to have a whole roll of kraft paper available.  It's tricky to work with all curled up, but I cut it down to workable pieces. I recommend using a sharp blade when cutting the kraft paper because it can rip so easily. Last year I purchased and downloaded Christmas music from Printable Heaven so I'm all set to make my own envelopes. I used some StazOn forest green ink with a pine branch to stamp the front and back of the card. I think it's a winner.


I used a pearly glimmer paper for this classic door with an oval window. 3 - layers each  1/4" smaller and a 1/4" scored border. 2 Layers are attached with dimensional squares. The SB oval cut on the 3rd layer is embossed and backed with vellum. An additional panel beneath the window has the "Merry Christmas" sentiment. The wreath topped with a red satin ribbon has the same pine bough punches with red stickles for berries. A brad for the door knob over a piece of aluminum tape. How fun! I really like this one too.


Gina K's lipstick red card stock is a favorite of mine and perfect for this red door. What's different with this one - and the green and brown door I posted previously - is I have inked the edges and attached the panels with dimensional squares. Not so flat. 


And this last card again has the inked and raised panels but the wreath is made from an old golden garland I found at a thrift shop. For $1.00 I have 10 feet of silver and gold garland made in USA in 1990 for trees under 4 feet tall.  So I'm pleased with my cards and envelopes but there are other differences I didn't mention. Can you spot them? Have fun and craft on:)


"Whatever you are by nature, keep to it; never desert your line of talent. Be what nature intended you for, and you will succeed."
Sydney Smith


Be well 
Carole

Saturday, December 3, 2011

Less is More Week # 44


Less is More Colour Challenge Green. The sponsor for this challenge is: "The Pretty Little Ribbon Shop". 
An online store supplying a good selection of quality ribbons, twine, rubber stamps and embellishments for all of your crafting needs. 


I like doing LIM for the clean and simple card. Once designed it's quick and easy to reproduce, and allows for subtle changes. Change the color the sentiment or an embellishment...totally different. 


In the May issue of Card Maker Magazine - Beth Pingry featured 3 different cards showcasing front doors. So that's been on my list...  recreate a door card for a Christmas card.


Since "green" is the color challenge I used that for the base of the card. I cut and scored the panels for the front door and attached them with adhesive. A green wreath wouldn't work on a green door so I colored, stamped and cut out the poinsettias, then covered them in Glossy Accents for a lovely sheen and to enhance the colors. The sentiment printed on white card stock is mounted on red and green  then hung by a golden ribbon. I used a gold brad as door knob on top of a scrap of outline sticker to resemble the hardware. Then added another little "inny" scrap to mimic a keyhole. So fun. 


Here's the first door card I made in chocolate brown. I cut and scored the panels for the door. I used 12 pine bough punch cuts on a circle to create the wreath. Red stickles to mimic the berries and a red paper bow with a tiny brad.  Again a brad for the door knob over a gold inny sticker and scrap for keyhole.


I'm surprised how different they look. They're both the same size yet the green door has the flowers mounted higher and so it looks wider. Do you have a preference?


I'm sure I could make several different versions of this card. Spring- Summer -Winter or Fall.  Tall and slim, arched window, cut out windows...the possibilities are endless. I hope I remember to do that;)


No creature is fully itself till it is, like the dandelion, opened in the bloom of pure relationship to the sun, the entire living cosmos. ~D.H. Lawrence


Be well my friends and followers....craft on! Carole

Tuesday, November 29, 2011

Christmas cards


While checking out entries for Less Is More Challenge I saw a card I just loved and immediately decided to do something similar. Then I challenged myself to use the same design and create different versions.


These two are made with a platinum shimmer paper for the base and the oval cut. Snowy glitter paper was used for the scallop cut. The ovals are embossed using Swiss Dots and a swirly bird embossing folder. The base is outlined by scoring 1/4" around the border.


The leaves I created by drawing a cluster of 3 , cutting them by hand then scanning to my computer. From my SCAL program I traced the leaves to create an svg file then sized them to 2.5" and cut several for these cards. The ribbon and the spray of pearls are attached with glue dots. I will probably use silver sentiment stickers "Merry Christmas" or "Seasons Greetings" centered at the bottom of the card. 


The second 2 cards are made using a textured off white card stock. The ovals are smaller cuts on very white card stock then placed in the center of the card. I used used smaller leaves on one with a white bow and holly leaves with a red bow for the other. So now as I look at them the shimmer cards have a very formal fancy feel. I prefer the all white card compared to the card with the red bow. 
What do you think? Which one do you prefer? I'm sure I can come up with several different variations for this simple design. How about you. Subtle differences are fun...doing the same thing repeatedly becomes dull and  boring.
 I took several pictures of my craft space in the middle of making these cards. My space gets so cluttered.... then my head gets to spinning ... so I have to stop and put things away before I can continue. Does this happen to you? So many questions today, I wonder does anybody read all this stuff? Well that's all for now. Maybe tomorrow I'll post the pictures of my craft room. Normally I end my posts with a quote...I know my sister enjoys them. I'd like to take a vote - Do you enjoy the quotes - it doesn't matter - or you didn't even notice.

 Be well - Carole.


Sunday, November 27, 2011

Buttons and Bows

  What to do when you wake up at 4 AM??? You go on line to Pinterest your bound to find some inspiration. I sure did. I haven't spent any time creating my own boards but I sure enjoy looking at others. I saw some amazing cards that I knew I wanted to recreate with my own touch.
Hero Arts had a button tree video that had me pulling out my old button stash. Shari's card is divine. So working with what I have on hand this is my version. It was fun to make and I really like it. Similar but unique.
My second card was inspired by 3 different cards I saw that used  small squares and rectangles to create gift boxes. So simple until you try to recreate it. Finding the right scraps to coordinate can be time consuming but putting the card together is a breeze. I will do a couple more versions of this card just for fun. 
Now I'll get back to playing with paper.  Have a great day. Thanks for looking.  Carole


My mom always said I liked to stir the pot with a glittering spoon. ~Kris Carr

Wednesday, November 23, 2011

Stars and snowflakes

I haven't posted anything in a few days but I've managed to make 4 simple Christmas cards. I had one sheet of navy blue suede paper that you would have to feel to appreciate.  It's a soft and luxurious piece of paper. I cut four pieces at:     4" X 5 1/4" to top the 4 1/4" X 5 1/2" base card.


I love navy with silver so I gathered my collection of peel off and outline stickers in silver along with MS snowflake punches and white glitter paper scraps. The bottom right card is covered with tiny little "inny pieces" from the peel off stickers. It reminds me of a starry night.  Can you image picking all those little pieces up with a straight pin and placing them on a card. I don't know...sometimes I just can't believe how easily I'm entertained. I actually found it to be relaxing. Now here's the thing - I like these cards and think they have a formal feel - but I consider them elementary level hand made cards. Impersonal - peel and stick. Maybe it's because they were so easy -  that I was compelled to apply all the tiny little "inny pieces".


What do you think about peel and stick cards? How about card kits - do you enjoy working with designers versions?


Now this is what has kept me busy. . . preparations for making over 50 handmade cards. First I drew this Santa, colored him with Prisma pencils then scanned him so I could reproduce smaller copies. After cutting out several smaller versions by hand I used white puff paint on his beard to add dimension. I've been drawing this Santa  since I was a teenager so my family will recognize that I drew him making it more personal. I look forward to designing many different cards and sharing them on my blog. Hopefully I will find a challenge or two that will work with my creations.


Until next time, thanks for visiting. Have a Happy Thanksgiving . . . 


I'm living in gratitude for all our creature comforts, our freedom, the time and space to create, and so much more. Carole ;)


The end of childhood is when things cease to astonish us. When the world seems familiar, when one has got used to existence, one has become an adult. ~Eugene Ionesco


Thursday, November 17, 2011

Holly Leaves

  I've created this one layer card using holly leaves for the
 "Less Is More" challenge. I used MS score board to create the 1/4" border, then used my favorite sakura gelly roll  pen to outline the scored lines. I printed the "Merry Christmas" using Vivaldi font on acetate with the mirror feature on, then I rubbed it on the card. 


I would really like to own some sentiment stamps but I'm on a budget and I would have to really LOVE the stamp or have a 50% off coupon before I purchased it. I just can't justify my compulsive need to want more craft items, when my craft space is so full of supplies. I am trying to live ...Less Is More ;)
 Now if I look at creating LIM Christmas Cards I would save a lot of time as well. Merry Christmas... poinsettia punch...or jingle bells...or Christmas tree, quick and simple, right?


Stay tuned we'll see what develops.


When my daughter was about seven years old, she asked me one day what I did at work. I told her I worked at the college - that my job was to teach people how to draw. She stared at me, incredulous, and said, "You mean they forget?" ~Howard Ikemoto


Be well...till we meet again ;) Hugs Carole

Thursday, November 10, 2011

Challenge # 98 "It's All White On The Night"

This challenge is to make a project using white as the main focal color, then using one other color only. Pretty simple. I used outline stickers and the Season's Greetings in silver. The base card is embossed with Swiss dots to represent snow. I used the SB Label Four die to cut the silver card stock then embossed the Christmas trees with white  powder, and attached it with dimensional dots and added the bow. I think it's lovely.


Thanks for looking. Be well Carole 

Cardabilities Challenge #42


 This cardabilities sketch really caught my attention. How striking and elegant. I immediately thought of using silver grey and black.
 The grey and white damask paper is elegant almost lacy . The first  grey strip is embossed with a herring bone pattern. Adding the black and silver gives it some class. What is not clear in the first photo is a small strip of silver mirror card stock and beside that is a silver glitter paper. The 2nd picture, you'll notice the mirror strip reflected the camera, so I took the next shot at an angle.  White glittered snow flakes and the sassy little elf add a bit of whimsy to the classy card. 
That's all for now... Thanks for visiting. Be well

Monday, October 3, 2011

Card Pattern # 236

Current Sketch  
Today I will show you my results using Styrofoam rubbings as snow and colored for floral effects. But first a new card pattern sponsored by Paper Makeup Stamps . If you're looking for some great ideas be sure to check out the designers take on this pattern. I've noticed other blogs offer a recipe for their cards instead of trying to explain it. So I"ll give that a try.      

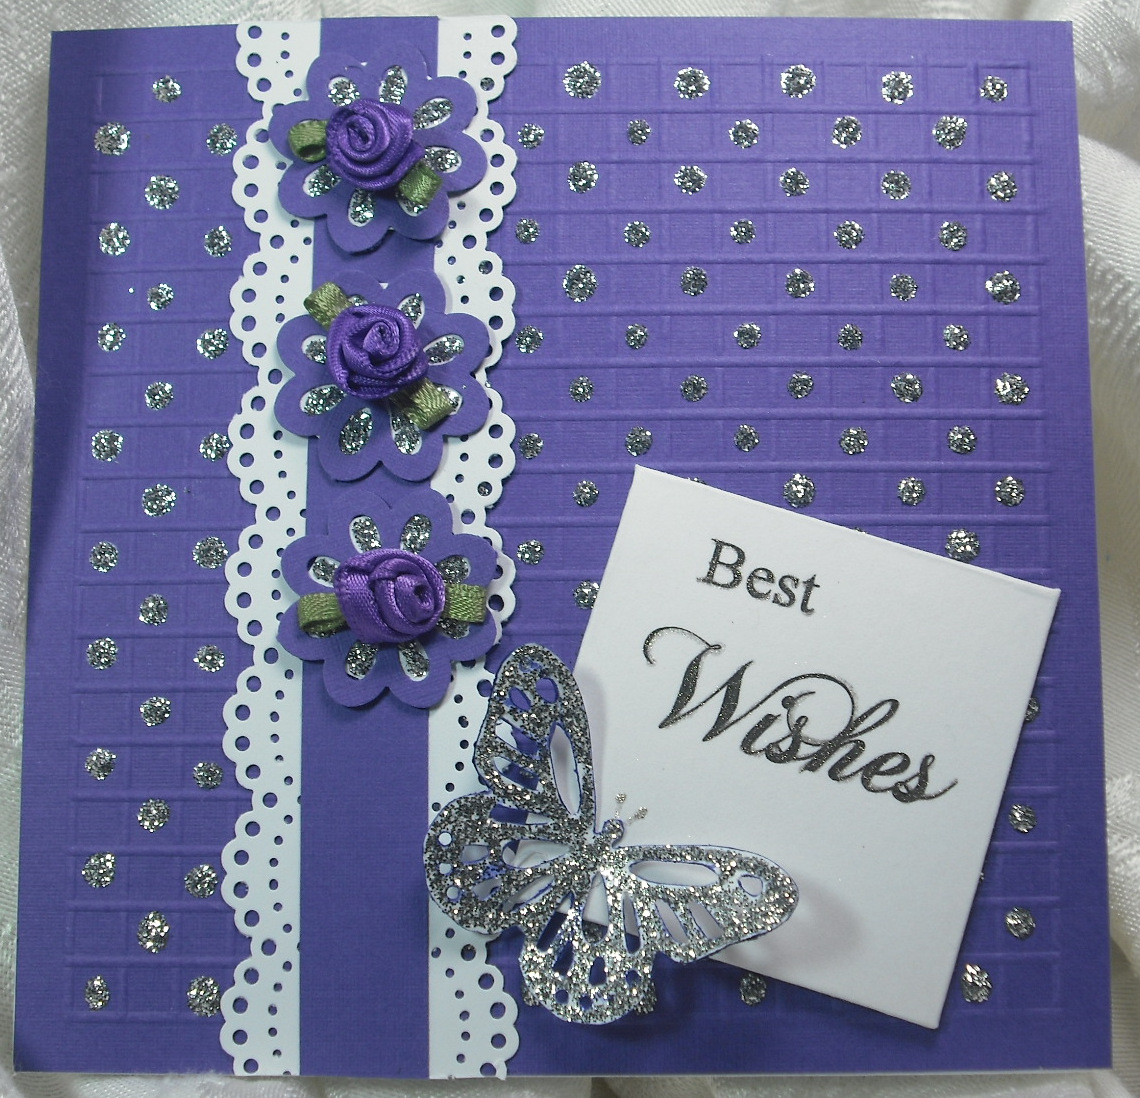
Starting with a 5" square base,  score a 1/4" perimeter around the square. Then score the entire square with 1/4 " lines horizontally and vertically creating little squares.  Using stickles place a dot on every other square. Let dry. Punch a butterfly and 3 flowers, outline and fill with stickles - let dry.
Cut 2) 1" X 5" white strips and punch using a MS border punch. Attach a 1/2" X 5' base color strip to border strip.  Add ribbon roses to the dried punched flowers with glue dots. Attach to base card.  Print or stamp sentiment on a 2" square. Using a sakura gelly roll pen  trace over sentiment and attach at an angle. It sparkles and shines. I love purple and think this would make a nice wedding card. 
Now about the Styrofoam rubbings: Linda from the Paper Boutique offered a tip contest last month and I learn so many fun crafting tips. My favorite was from Sharon who explained that rubbing Styrofoam pieces together creates a snow like substance similar to flower soft. I had to try it. Wow... it worked. I rubbed and rubbed and filled 3 baby food jars with the:  Styrofoam Crumbs (SC). Than I added several drops of  sail boat blue adirondack alcohol ink and stirred it up. Fun.. I left the lid off so the fumes would disperse, but now I have blue crumbs. Here are my examples using the SC. I used  scotch quick dry adhesive because it's thick enough and it does dry quickly. I'm not sure if you can see it but it sparkles. How cool is that.
Well it's time to feed my man and our dog Beau. Time really flies when your focused on completing something. This blog page has not been very cooperative today, it looks good here but when I preview it looks different- to much white space. Does that happen on your blog?


No time to search for a quote. Have a great week-Carole